Single Sign-On (SSO) #
Bytebytego
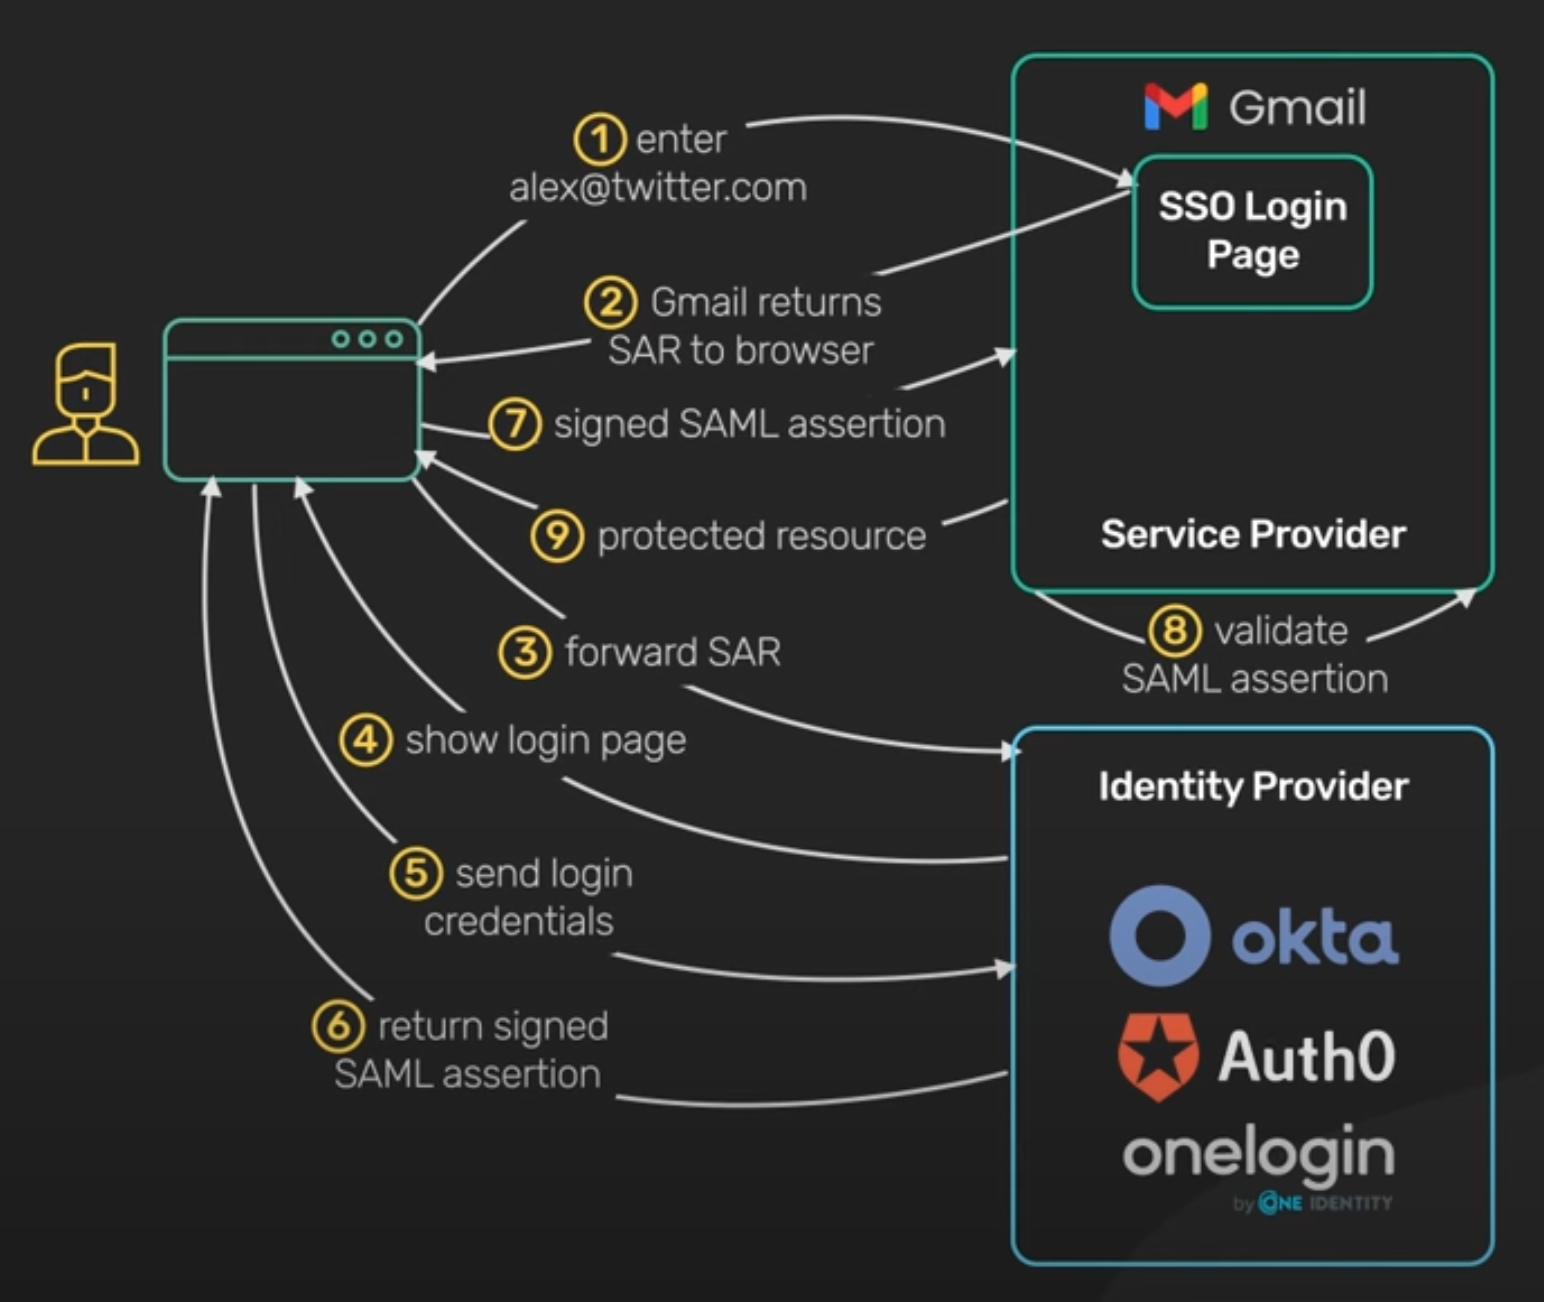
雖然上圖是以 SAML 為例,但 SSO 流程大致相同,SAML與OIDC最大的差異在驗證請求的格式,前者用xml後者用 jwt 。
OIDC (OpenID Connect) #
Authorization vs. Authentication #
授權的重點在於使用者可以做什麼,認證則著重於使用者是否合法 (我是誰)
在談到 OIDC 前需要先了解為何需要,OIDC 是 OAuth2 的擴充協定,但 OAuth2 如其名是「授權 (Authorization)」的協定,如果用其做驗證會引發許多資安問題,在 Oauth.net 的文章中做了一個巧克力和軟糖的譬喻:
To help clear things up, it may be helpful to think of the problem in terms of a metaphor: chocolate vs. fudge. From the start, the nature of these two things is quite different: chocolate is an ingredient, fudge is a confection. Chocolate can be used to make many different things, and it can even be used on its own. Fudge can be made out of many different things, and one of those things might be chocolate, but it takes more than one ingredient to make fudge happen and it might not even involve chocolate. As such, it’s incorrect to say that chocolate equals fudge, and it’s certainly overreaching to say that chocolate equals chocolate fudge.
在這個例子中,OAuth2 就是巧克力,他可以是很多授權機制的基礎。認證協議則是一種軟糖,需要結合一些關鍵的加密、識別元件 (例如:生物特徵、帳號密碼)或是流程,才能使認證系統變得更適合與安全。而 OAuth2 授權的流程有四種,這四種 Grant Type 與 OIDC 關係密切。
OIDC #
如同 OAuth2 的流程,OIDC 把授權請求與授權回應包裝成了認證請求與認證回應,在spec定義了需要的欄位,如果透過 Authorization Code 的流程來作認證,流程大致上如下:
- Client prepares an Authentication Request containing the desired request parameters.
- Client sends the request to the Authorization Server.
- Authorization Server Authenticates the End-User.
- Authorization Server obtains End-User Consent/Authorization.
- Authorization Server sends the End-User back to the Client with an Authorization Code.
- Client requests a response using the Authorization Code at the Token Endpoint.
- Client receives a response that contains an ID Token and Access Token in the response body.
- Client validates the ID token and retrieves the End-User’s Subject Identifier.
流程聽起來可能有點抽象,用一個實際的例子來說明
準備驗證請求的參數 #
假設使用者透過第三方軟體使用 AWS 資源,例如查看 Cloudwatch Dashboard,此時 User Agent 收到的回應會像這樣:
HTTP/1.1 302 Found
Location: https://server.example.com/authorize?
    response_type=code
    &scope=openid%20profile%20email
    &client_id=s6BhdRkqt3
    &state=af0ifjsldkj
    &redirect_uri=https%3A%2F%2Fclient.example.org%2Fcb
也就是 AWS 會將使用者導到身份供應商,常見的供應商例如 Auth0、okta等等。
發送驗證請求 #
User Agent 收到 302 返回後,會根據返回的地址像被導向的身分供應商發出驗證請求。在這裏 OIDC 規定必須要支援 GET/POST 兩種方法。
GET /authorize?
    response_type=code
    &scope=openid%20profile%20email
    &client_id=s6BhdRkqt3
    &state=af0ifjsldkj
    &redirect_uri=https%3A%2F%2Fclient.example.org%2Fcb HTTP/1.1
Host: server.example.com
驗證請求 #
身分供應商驗證請求主要驗證四件事情:
- 驗證所有 OAuth2 的參數符合規範。
- 驗證 scope 欄位必須要含有
openid這個值。 - 檢查所有 OAuth2 標示為
REQUIRED的參數不為空。 - 如果 ID Token 有要求
sub欄位需要是特定的值,身份供應商只能在sub值相同並擁有還未過期的 session 時才能給正向的回覆。
認證使用者 #
使用者此時在身份供應商提供的 End-User 驗證頁面。驗證成功後會將使用者導向 Token Endpoint,此時的 redirect uri 身上是有授權碼的,透過這個授權碼可以向 Token Endpoint 取得 ID Token/Access Token。
HTTP/1.1 302 Found
Location: https://client.example.org/cb?
    code=SplxlOBeZQQYbYS6WxSbIA
    &state=af0ifjsldkj
取得 ID Token/Access Token #
ID Token 會是 JWT 格式,這也是 OIDC 與 SAML 最大的差異,而 ID Token的驗證通常都是以公私鑰的方式完成。詳細的驗證規範需要參考文件。
HTTP/1.1 200 OK
Content-Type: application/json
Cache-Control: no-store
Pragma: no-cache
{
    "access_token": "SlAV32hkKG",
    "token_type": "Bearer",
    "refresh_token": "8xLOxBtZp8",
    "expires_in": 3600,
    "id_token": "eyJhbGciOiJSUzI1NiIsImtpZCI6IjFlOWdkazcifQ.ewogImlzc
        yI6ICJodHRwOi8vc2VydmVyLmV4YW1wbGUuY29tIiwKICJzdWIiOiAiMjQ4Mjg5
        NzYxMDAxIiwKICJhdWQiOiAiczZCaGRSa3F0MyIsCiAibm9uY2UiOiAibi0wUzZ
        fV3pBMk1qIiwKICJleHAiOiAxMzExMjgxOTcwLAogImlhdCI6IDEzMTEyODA5Nz
        AKfQ.ggW8hZ1EuVLuxNuuIJKX_V8a_OMXzR0EHR9R6jgdqrOOF4daGU96Sr_P6q
        Jp6IcmD3HP99Obi1PRs-cwh3LO-p146waJ8IhehcwL7F09JdijmBqkvPeB2T9CJ
        NqeGpe-gccMg4vfKjkM8FcGvnzZUN4_KSP0aAp1tOJ1zZwgjxqGByKHiOtX7Tpd
        QyHE5lcMiKPXfEIQILVq0pc_E2DzL7emopWoaoZTF_m0_N0YzFC6g6EJbOEoRoS
        K5hoDalrcvRYLSrQAZZKflyuVCyixEoV9GfNQC3_osjzw2PAithfubEEBLuVVk4
        XUVrWOLrLl0nx7RkKU8NXNHq-rvKMzqg"
}
最後就可以藉由 ID Token/Access Token 取得資源。
OpenID Connect Core 定義了很完整的身分驗證流程,但他是抽象化的,保留了一些實作細節讓其他時作者自行補充。OpenID Connect Discovery 是其中一個補充協定,因為在 OIDC 驗證的流程中需要很多 IDP 的端點,放在 IDP的教學裡會顯得冗長,所以它定義 OpenID Provider 需要一個提供 URL 如:
http://example.com/.well-known/openid-configuration